A Guide to Efficiently Using Irssi and Screen
Irssi is a text-only IRC client. It does not get in your way and its commands are intuitive and useful. Non-standard features are implemented with perl scripts, rather than in the core. Irssi can range from a functional, no-frills client to a highly-customized and automated client.
Irssi is not the only focus of this guide. GNU screen, the well-known terminal multiplexer, is also discussed. Screen is a highly useful tool that allows a user to manipulate multiple windows inside of a single session. Each window operates independently of the others and acts like another terminal. For example, a user can create a screen session with Irssi running in the first window, an instant messenger program open in the second window, and a general purpose shell prompt in the third window. The beauty of the screen is that users can “detach” from their screens, logout, and then at a later time, login again “reattach” to find their programs still running just as they left them. The steps to do this are explained in this guide.
Irssi Basics
Getting Connected
The first step is to start irssi. Run from your shell:
irssi
You should now see Irssi in its default state–disconnected, with some blue bars at the top and bottom.
In Irssi, there are three important connection-related commands: /server,
/connect, and /disconnect. Irssi can handle multiple IRC connections
simultaneously, thus it is possible to be active in channels on different
networks at the same time. The first command, /server, will connect to the
specified server on the current network. On the other hand, /connect will
open a new network connection and connect to the specified server on the new
network.
For example, typing /connect irc.foo.com will open a new network connection
and connect to irc.foo.com. If you then type /connect irc.bar.com, there will
be two network connections open, one for irc.foo.com, one for
irc.bar.com. Typing /server irc.baz.com while the network connection for
irc.bar.com is active will disconnect the client from irc.bar.com and connect
to irc.baz.com on that network connection. You can use Ctrl-X to switch
between network connections. You can see what the active network is by looking
at the status bar, which looks something like this:
(05:23:10) (ms[+abilorsuwxyz]) (1:NullIRC (change with ^X))
In this example, NullIRC is the active network. Feel free to test this on your
own. Use /disconnect to disconnect from the active server. Move on after you
have disconnected from all servers.
At this point you should have a just-opened instance of Irssi, with no connections to any server. Connect to an IRC server by typing:
/connect irc.nullirc.net
If everything connected fine, join a channel by typing:
/join #test
Switching Windows
You should now notice that the “status” window is now hidden, and you’re
looking at the channel you just joined. You should also notice that your status
bar says “2:#test”. This means that the window for #test is assigned window
number 2. The status window is by default window number 1. To switch between
windows in Irssi, use Alt-#, where # is 0-9. Windows start at number 1, and
Alt-0 goes to window number 10. You can use Alt-q through Alt-o for
windows 11 to 19. It is possible to have more than 19 windows. Use Alt with the
arrow keys to scroll through the windows.
Tip: If you’re trying to get to end windows past 19, start at window 1, and then use Alt with the left arrow key.
Advanced note: use /help bind to learn about the /bind command. It can be
used to assign keyboard shortcuts to windows past 19.
Using the Alt key as Meta
In some cases, using Alt as the modifier for window switching does not work. Macs have this ‘problem’; the alt key on Mac OS X’s terminal does not send an escape by default. The escape key may usually be used as a replacement for Alt for switching windows. If you’d like to use your Mac’s Alt key to send an escape and properly switch windows in Irssi, do the following:
Terminal.app (10.5 Leopard, 10.6 Snow Leopard)
- Choose “Preferences” from the Terminal.app menu
- In the “Settings” group, choose your profile.
- Go to the “Keyboard” tab
- Check “Use option as meta key”
Terminal.app (10.4 Tiger)
- Choose “Window Settings” from the Terminal menu
- Choose “Keyboard” from the dropdown in the dialog that pops up
- Check “Use option key as meta key”
- Click Use Settings as Default
iTerm
- Choose “Manage Profiles” from the Bookmarks menu
- Expand “Keyboard Profiles”
- Select “Global”
- Select “Option Key as +Esc”
Query Windows
Once you’re comfortable with the window switching, join another channel on the network and talk with people. Open a private message using:
/q <nick>
/q is short for /query. Both commands work, as /q is just an alias for
/query. Irssi has many default aliases that aid in controlling your IRC
client more quickly and easily. You can see them using /alias and looking at
your status window. Remember that Alt-1 switches to your status window.
Once you’ve finished typing in your query, type /q in the window to close
it. Closing windows can also be accomplished using /wc (an alias for /window
close). Using the /wc method is useful for parting channels on disconnected
networks. In these cases, simply using /part will not work.
And with that, you have learned the basics of using Irssi–connecting, joining channels, opening and closing query windows, and switching through windows. Continue reading to learn more about Irssi’s other features and commands.
More Irssi
Changing Settings
Switch to your status window and type /set. You’ll see your screen scroll
with various setting = value lines. Use page up and page down to look
through them (sometimes it is necessary to hold shift down while using these
keys). These are the configurable settings of your IRC client. You can specify
which ones in particular you’d like to see, instead of viewing all of them, by
including a keyword after /set. Try: /set timestamp. The output should look
something like this:
05:50 [lookandfeel]
05:50 timestamps = ON
05:50 timestamp_format = %H:%M
05:50 timestamp_timeout =
05:50 timestamp_level = ALL
The setting of timestamp_format controls the appearance of the timestamps
used in the client. I personally prefer having the seconds also displayed. One
way to have the seconds displayed is the following:
/set timestamp_format %H:%M:%S
Once you change a setting, use:
/save
to save your changes to your Irssi config file, located at ~/.irssi/config.
Aside: My real
timestamp_formatis%d.%H%M%S, which looks like “16.213823” (16th day of the month at 21:38:23). This timestamp is precise, minimal, and useful when scrolling back through several days of logs.
Tab Completion
Now would be a good time to learn of Irssi’s tab-completion feature. One of the
most fantastic features of Irssi is its ability to complete a nickname,
variable, or file using the tab key. Try typing /set time, and instead of
pressing enter, press the tab key. You will notice that Irssi completes the
variable name. Press tab repeatedly to cycle through the matching
variables. You can also use the tab completion to complete nicknames in
channels or query windows by typing out the first few letters of their name and
pressing tab.
Perl Scripts
Most non-standard functionality is added through the use of perl scripts. There
is a large database of these scripts available at
scripts.irssi.org. To use them, download the perl
scripts to your ~/.irssi/scripts directory, and then type:
/run <scriptname>
Put the scripts (or symbolic links to them) in ~/.irssi/scripts/autorun to
make them load automatically when Irssi starts. It’s important that you read
the top of each script you download; usually there is documentation there of
some kind explaining the settings for the script. I recommend installing the
following scripts to start:
- splitlong.pl
Splits long messages into multiple lines to avoid having messages truncated due to IRC limits. - dispatch.pl
Sends unknown commands, such as server-specific commands like/map, to the server instead of requiring the use of/quote(e.g.,/quote map). - usercount.pl
Makes population of the current channel available for display in the status bar. Read the script for instructions for use.
Defining networks and servers
By now you should have a good start to using Irssi for your needs. Irssi is
simple to use. You can learn a great deal about Irssi by reading its help. Type
/help in Irssi to get a full list of commands (including those from perl
addon scripts) in your status window. To see detailed information a particular
command, use /help <command>. In particular, I strongly recommend learning
about the /network command in more detail:
/help network
The /network command manages the networks that Irssi knows about. If you
define the networks that you frequent, you can set multiple servers for a
particular network and then simply use /connect <network name> to
connect to that network. If the first server fails, the next server in the list
you defined with /server will be tried. You can also define a command to
send to the server upon connection to the network. This is useful for automatic
identification to a NickServ service or opering up, if you have an o:line.
A minimal use of /network and /server, followed by /connect, might look
like this:
/network add -autosendcmd "/^msg bot hi" freenode
/server add -network freenode irc.freenode.net
/connect freenode
When this sequence of commands is run, Irssi will connect to the Freenode IRC
network at irc.freenode.net, and upon connect, will say hi to bot. The caret in
/^msg tells Irssi to not display this message locally.
Use /network list and /server list to see all of your configured networks
and servers.
Note: the /network command replaced /ircnet in Irssi
version 0.8.10. If you are using irssi 0.8.9, ask your system administrator to
upgrade and use /ircnet in the meantime.
Learning Screen
Screen is a wonderful program that creates a “session” in which several “windows” exist. In each window is a shell prompt, from which commands can be executed and programs can be run. With screen, a user can “detach” from his or her screen session, log out, eat some runts, log back in, and reattach to the screen session and find it in the same condition as it was left. Read on for a demonstration.
Starting Screen
If you have Irssi open, use /quit to close it. When you’re back at your shell
prompt, start screen:
screen
You should be immediately returned to a shell prompt. You’re now inside of your
screen. You can see this by typing screen -list
ms@turing ~ $ screen -list
There is a screen on:
        7517.pts-0.turing    (Attached)
1 Socket in /var/run/screen/S-ms.
Now, type irssi. If you took the time earlier to define your networks with
/network, you can type irssi -c <network name> here to automatically
connect to the desired network. Irssi should open as it did before, but now
it’s running inside of screen.
Detaching
There are certain keystrokes that you can make inside of a screen session to control it. The commands are in the format of Ctrl-a,letter, usually. This is executed by pressing the control key and the ‘a’ key at the same time, releasing both, and then pressing letter. At this point you should learn to detach from your screen session. Press ctrl-a,d to do this (Press ctrl-a, release, press d). When this is done, you should see something like “[detached]” print to your terminal. If you see this, you’re no longer in screen, but Irssi is still running in the background. For effect, feel free to disconnect from your shell completely and then log back in before continuing to the next step.
Reattaching
You should be at your shell prompt right now, outside of screen. Before, you
typed screen to run it. Running screen with no arguments creates a new
screen session. You can have multiple screen sessions, but this will not be
discussed here. Read the manpage of screen for more information. Since you have
already created a screen session, you do not want to make a new one, you want
to reattach to the one you already created. To do this, type:
screen -rd
The arguments -rd tell screen what you want it to do: reattach and detach
before reattaching if necessary. These arguments are safe to use in just about
every case. If your screen session is attached elsewhere, using -rd will
detach that session, and reattach it here.
Magically, irssi should have reappeared. This is the point where you stand back for a moment and say “Wow, that kicks ass,” because now you should understand that you can leave Irssi running all the time under screen, detach from screen and disconnect from your shell, come back later, login and reattach and there Irssi will be. You should also see that with screen, you will have the ability to log in from anywhere and continue your IRCing (or whatever work you’re doing in another screen window) just as you left it.
More Screen Functionality
You just learned the basics of screen. Now you should learn how to create new windows inside of screen. This is done by typing C-a c (this is how it is written in the screen manpage. It means Ctrl-a,c). As new windows are created, you will be automatically switched to them. You can navigate through screen windows using C-a #, starting at zero, so Ctrl-a,0 should take you back to Irssi. Here’s a cheat sheet (from the screen manpage):
The following table shows the default key bindings:
| Keystrokes | C-a : Command | Action |
|---|---|---|
| C-a 0 | select 0 | Switch to window 0 |
| C-a 9 | select 9 | Switch to window 9 |
| C-a C-a | other | Toggle to the window displayed previously. |
| C-a a | meta | Send the command character (C-a) to window. See escape command. |
| C-a A | title | Allow the user to enter a name for the current window. |
| C-a c | screen | Create a new window with a shell and switch to that window. |
| C-a C-c | screen | Create a new window with a shell and switch to that window. |
| C-a C | clear | Clear the screen. |
| C-a d | detach | Detach screen from this terminal. |
| C-a C-d | detach | Detach screen from this terminal. |
| C-a D D | pow_detach | Detach and logout. |
| C-a k | kill | Destroy current window. |
| C-a C-k | kill | Destroy current window. |
| C-a space | next | Switch to the next window. |
| C-a n | next | Switch to the next window. |
| C-a C-n | next | Switch to the next window. |
| C-a x | lockscreen | Lock this terminal. |
| C-a C-x | lockscreen | Lock this terminal. |
| C-a w | windows | Show a list of window. |
| C-a C-w | windows | Show a list of window. |
| C-a ? | help | Show key bindings. |
Take a moment to look over those commands. They should tell you how to
basically operate screen, especially the last one. There are plenty more, use
Ctrl-a,c and then type man screen for the full list.
Troubleshooting
If you mess up and screen doesn’t seem to work correctly, remember to use
screen -list (or screen -ls) to see where you are. You should pay attention
to whether or not you are attached, detached, or if screen is running at all.
Killing a Screen Session
If you end up with multiple screen sessions, you have to specify which session
when you want to attach. If this is not desired, kill one of the sessions by
first using screen -list to find the id of the session. The id will
look something like 8037.tty1.godfather. With the id in hand, run:
screen -X -S ID kill
to kill the screen session with id ID.
Dealing With Flow Control
If you accidentally hit Ctrl-s or Ctrl-a s, you may notice some general
unpleasantry, namely that your screen session (or irssi) stops updating. I
suggest reading more about flow control and
how screen handles it. The
quick fix is to type Ctrl-q or Ctrl-a q (depending on which you used
first). I have the following in my shell’s rc file to turn off flow control
handling completely, since I like using Ctrl-s for some programs:
stty -ixon -ixoff
Non-blocking mode
Before you disconnect from your shell, make sure you detach from your screen
using the appropriate detach sequence. This keeps programs like irssi from
hanging while waiting for input. To avoid having to worry about this, put
defnonblock on in your ~/.screenrc. Read more about the
nonblock option
in the screen manual.
Customizing Irssi’s Display
Ample time should be spent adjusting the appearance of irssi to make the client suitable for you. This includes changing the theme, adding or splitting windows, and manipulating the statusbars. I’ll go over the basics of how to obtain a more complicated Irssi setup like this:
Theme
The theme only changes the colors of text and objects in Irssi, as well as some
symbols used in the statusbars. The >> used at the beginning of the statusbars
in my screenshot is there because of the theme I’m using. The theme used in that
screenshot is my own hack of the irssi default themes called
fear2.
To load a new theme, first download the .theme file into ~/.irssi; from a
shell prompt:
wget -P ~/.irssi https://raw.githubusercontent.com/msparks/irssiscripts/master/themes/fear2.theme
then use /set theme fear2 in irssi, where “fear2” is the part of the
filename before .theme. Don’t forget to /save if you want to keep that
theme setting.
Hilight Window
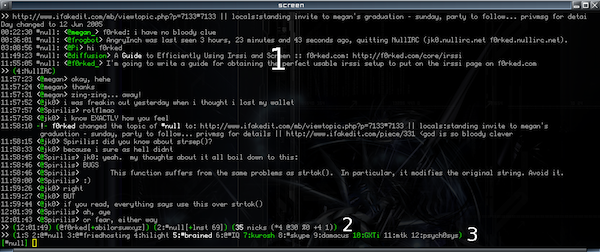
See the irssi screenshot above. The section labeled “1” is a split window
called “hilight”. Anything that is hilighted (set using the /hilight command)
will be logged to that window.
To do this, first load the script. The script I use is a modified version of
cras’s hilightwin.pl that logs timestamps as well. It is available here:
hilightwin.pl
Put the script in ~/.irssi/scripts/autorun/ and type /run
autorun/hilightwin.pl in irssi.
Next, create the split window. This is done with the /window command. See
/help window for details on how this works.
/window new split
/window name hilight
/window size 6
The above commands will create a new split window (as opposed to a “hidden” window, which privmsg, channel, and status windows are by default), call it hilight (so the script knows where to send the information) with a height of 6 lines.
Now, have someone address you in a channel using “yournick: hello”. If you did
everything correctly, it should be logged to the split window. If you want to
have all lines containing your nick hilighted, type /hilight -word
yournick. See /help hilight for advanced features. Use /layout save to
save your layout settings and have irssi automatically recreate the split
hilight window on startup.
Note: you may notice that when starting up a fresh Irssi instance after having configured the hilight window, the active window is the hilight window instead of the status window. If you connect to servers with the hilight window active, your channels may be placed in the top container instead of the bottom container as you would expect. A simple workaround for this is to simply hit
Alt-1to switch to your status window, which is in the bottom container, before you connect.
Statusbar
See number 2 in the screenshot above. This is the default statusbar that you
will see in any default irssi setup. However, mine is slightly modified to
include a user count of the current channel. This is easily done by loading the
usercount.pl script and typing
/statusbar window add usercount in irssi.
Channel Statusbar Using Advanced Windowlist
This is my favorite part of my Irssi setup. The screenshot above displays chanact.pl to list windows open in Irssi. As of October 16, 2005, this article explains the setup of awl (Advanced Windowlist) instead of chanact.
Download
adv_windowlist.pl
(known as ‘awl’). This is a fabulous script that grants powerful manipulation
of the active window list. Put the script in ~/.irssi/scripts/autorun and run
it: /run autorun/adv_windowlist.pl
Upon loading, AWL will create new statusbars on its own. AWL is an updated version of the older chanact.pl script. AWL has many, many new features developed by Nei. It would be worth your time to read the comments at the top of the script to get a feel for what all you can do with it (an entire article could be written on the features of this script and how to use them).
Now would be a good time to remove the standard Act statusbar item. If you’re
unfamiliar with what I’m talking about, the act object is the part of the
default statusbar that says (Act: 2) when window 2 has activity. With awl
loaded, you won’t need it anymore.
/statusbar window remove act
You can see all available settings (which will be listed in your status window)
for awl by typing /set awl. The possible settings and explanations for them
are listed at the top of the awl script. The current settings I am using for
awl are:
/set awl_block -14
/set awl_display_key $Q%K|$N%n $H$C$S
/set awl_display_key_active $Q%K|$N%n $H%U$C%n$S
/set awl_display_nokey [$N]$H$C$S
If you like the setup, type /save to keep it. You can revert to the old act
setup using /script unload adv_windowlist and /statusbar window add -after
lag -priority 10 act.
Irssi Command Reference
Here is a list of common commands, aliases, and some tips on using them. Usage
and additional information can be obtained by typing /help /command in
irssi.
| Command | Alias | Info |
|---|---|---|
| /ban | /bans, /b | Sets or List bans for a channel |
| /clear | /c, /cl | Clears a channel buffer |
| /join | /j | Joins a channel |
| /kick | /k | Kicks a user |
| /kickban | /kb | Kickban a user |
| /msg | /m | Send a private message to a user |
| /unban* | /mub | Clears the unbanlist (unbans everyone) in a channel |
| /names | /n | Lists the users in the current channel |
| /query | /q | Open a query window with a user, or close current query window |
| /topic | /t | Displays/edits current topic. Tip: use /t[space][tab] to automatically fill in existing topic. |
| /window close | /wc | Force closure of a window. |
| /whois | /wi | WHOIS a user. Displays user information |
Tips
When selecting URLs using a double-click, the Windows SSH client
PuTTY will choke on the
colon and possibly some other characters. You can fix this by changing the
character class of these troublesome characters in the PuTTY options under
Window -> Selection to match the character class of typical alphanumeric
characters (which is ‘2’ at the time of this writing). Essentially, this
changes what PuTTY considers to be a ‘word’ when double-clicking.
Linux terminal emulator programs also have this problem. The terminal emulator
rxvt-unicode (urxvt), which has a resource option called cutchars (read the
manpage for urxvt). The
default cutchars setting breaks ‘words’ on any of those characters.
However, adding this to your ~/.Xdefaults file will adjust urxvt so that URLs
containing & , = ? ; will not break words so they can be selected entirely
with one double-click:
URxvt*cutchars: `"()'*<>[]{|}
Launching URLs from rxvt-unicode (urxvt)
URLs can be launched from urxvt with something like the following in your
~/.Xdefaults:
urxvt*perl-lib:         /usr/lib/urxvt/perl/
urxvt*perl-ext-common:  default,matcher
urxvt*matcher.button:   1
urxvt*urlLauncher:      /usr/bin/firefox
(Thanks to anrxc for this tip.)
UTF-8 in Irssi and Screen
This topic is covered elsewhere but I mention it here for completeness. There are usually three steps involved with getting UTF-8 support in Irssi:
- Fix your locales
- Enable UTF-8 in screen
- Enable UTF-8 in irssi
First, check your current locales. Run locale in a terminal. Mine look like
this:
LANG="en_US.utf-8"
LC_COLLATE="en_US.utf-8"
LC_CTYPE="en_US.utf-8"
LC_MESSAGES="en_US.utf-8"
LC_MONETARY="en_US.utf-8"
LC_NUMERIC="en_US.utf-8"
LC_TIME="en_US.utf-8"
LC_ALL=
If yours are all set to POSIX or are missing the “.utf-8” suffix, you need to
generate and set your UTF-8 locales. In Debian and Ubuntu, simply run sudo
dpkg-reconfigure locales and select the UTF-8 locales you desire. If
everything goes smoothly, after logging in again, you should see “utf-8”
suffixes in locale. For other distributions, refer to your distro-specific
documentation.
Now that the hard part is over, you must enable UTF-8 support in screen. This is done a variety of ways. The best way is to put
defutf8 on
in your ~/.screenrc and start screen. If you’re already running screen, you
can avoid restarting it by using Ctrl-a :utf8 on to enable this option.
Enabling UTF-8 support in Irssi is typically as simple as /set term_charset
utf-8 and /save. Try pasting some Japanese characters from
www.yahoo.co.jp to test.
If you get garbage when you type foreign characters, something went wrong with the above three steps. Try to deduce the problem by running Irssi outside of screen or running other unicode-enabled programs inside screen. However, if you get square boxes, you’re probably missing some terminal fonts for those characters and you should consult your package manager.
Resources
Happy Irssi-ing and screening. You may use man irssi and man screen
at a command prompt for more detailed information about both of the programs
discussed in this guide. Read Irssi’s help with /help to learn about
useful features not discussed in this tutorial, and also visit the following
sites:
- Official documentation - Docs on the official irssi website, irssi.org
- web::irssi::scripts - Archive of many, many various scripts for use with irssi.
- Guide to Using Screen and Irssi by Elizabeth Overal - Another screen+irssi tutorial with some more information. Thanks for the link, Lizzie.
- Blinkenshell - Free UNIX shell provider.